
In this article (9 sections)
It's Saturday, the back walk has a lip on it again, there's a hammer drill in the garage, and a few videos make lifting concrete look like a two-beer project. Some of it is. Plenty of concrete problems are within reach of a handy homeowner, and we'd rather you fix those yourself than pay anybody; the ones that aren't are what a pro is for, and around here that's our concrete leveling in Green Bay service. The trick is knowing which problem you have, because "leveling" covers several different jobs and only one of them involves lifting anything.
In Green Bay or Northeast Wisconsin? Get a firm price from photos. If the job turns out to be more than a weekend project, send three photos of the slab and we'll text you a price for the lift. How we do it, what it costs and what the warranty covers is on our concrete leveling page.
First: What Are You Actually Trying to Fix?
| What you see | What it really is | The DIY tool for it |
|---|---|---|
| Slab dropped, with a lip at the joint | The slab sank. There's a void underneath. | Lifting (by hand on tiny slabs, foam kit on small ones) |
| Surface is rough, pitted, or has shallow low spots | A surface problem. The slab hasn't moved. | Patch or resurfacer |
| Gaps at joints, cracks, a gap along the house | Openings that let water in | Sealant / caulk |
| Pavers or stepping stones wobbling or tilting | The base under them settled | Pull, re-base, relay |
Pick the wrong tool and you can spend a weekend making the problem harder to fix. The classic example is pouring self-leveler over a slab that sank.
Go Ahead and DIY These
These are honest homeowner jobs. You don't need us for any of them.
- Pavers and stepping stones. Pull the sunken ones, scrape out the old bedding, add and tamp base material until it's firm, screed a thin layer of sand, and set the paver back a hair high so it settles in.
- Plastic or composite AC pads. These get re-leveled with compacted gravel underneath. The pad is easy. The refrigerant lines attached to the unit are the delicate part, so plenty of people have their HVAC company do it at a tune-up.
- Patching chips and small holes. Vinyl or polymer-modified patch products feather out well on small damaged spots. Read the bag for traffic times. Some want a full day before you walk on them and longer before you drive on them.
- Sealing cracks and joints. A self-leveling polyurethane sealant in a caulk gun does a good job on horizontal joints and cracks. Clean out the crack first, use backer rod in anything deep, and don't fill a joint flush with dirt still in it. (If you'd rather skip it, we caulk joints, cracks, and the gap where concrete meets the house, and it's easy to add right after a lift.)
- Fixing the water. This one does more than any product on the shelf. Extend downspouts several feet past the slab, point sump discharge away from concrete, and build soil up along slab edges so water runs away instead of underneath. In northeast Wisconsin, spring snowmelt does most of the damage, so do it before the next thaw.
Before you trench: Burying a downspout extension or regrading counts as digging. Wisconsin law requires contacting Diggers Hotline at least three working days before you dig. Call 811.
Maybe: Small Jobs With a Real Learning Curve
Jack-and-pack on small, light slabs
The idea is simple: pry or jack up one edge, pack gravel or sand under it, and set it back down.
It works on a stepping pad or a small landing. The limit is weight. Normal concrete weighs roughly 145 pounds per cubic foot, so a 3-by-3-foot pad, 4 inches thick, is around 435 pounds. A 4-by-4-foot sidewalk square at the same thickness is closer to 775. Lever one edge of that and the slab is trying to bend, which concrete doesn't do. It cracks.
If you try it:
- Lift evenly and slowly, using a long board as a spreader so you're not point-loading one corner.
- Never put your hands or feet under a raised slab. Block it with lumber as you go.
- Pack, tamp, and repeat. Loose material dumped in settles fast, and you'll be back at it next spring.
Consumer foam lifting kits
These exist: small two-part polyurethane kits sold for lifting a single sidewalk square, a step, or a small pad, or for filling voids. You drill holes, set injection ports, and dispense foam that mixes, expands, and hardens under the slab. They run at much lower pressure and volume than professional equipment. Some are marketed to homeowners, and others are sold mostly to contractors with training recommended.
What to know before you buy one:
- They're sized for small areas. They're not built for driveway panels, garage approaches, or big patios.
- The chemicals need respect. One component is hazardous until it cures. Wear chemical-resistant gloves, eye protection, and a proper respirator, and follow the safety sheet that comes with the kit.
- Temperature matters. Cold chemicals don't react properly. Late-fall Wisconsin mornings can be too cold even when the afternoon feels fine.
- You get one shot. Once foam hardens, it's there. A slab you over-lift stays over-lifted.
And skip the cans of expanding gap filler from the insulation aisle. That's made for sealing gaps around windows, and it's nowhere near firm enough to hold up a slab.
Two more things people search for and don't find. There's no DIY PolyLevel: that's a brand name for foam lifting installed by its dealer network, and what's sold to homeowners are generic two-part kits like the ones above. And for scale, a professional lift of one sidewalk panel, AC pad or small stoop runs $300–$600 with us (our minimum is $300; the full price sheet has the rest), which is the number to weigh a kit, a respirator and a Saturday against.
DIY Mudjacking: Why We'd Skip It
Mudjacking is the older way to lift a slab: drill holes about 1 1/2 to 2 inches across and pump a cement slurry underneath until the slab rises. Doing it yourself means getting hold of a slurry pump and mixing a fill that weighs about 100 to 150 pounds per cubic foot, which piles more load onto soil that already let the slab down. It's hard to stop a heavy, pumped slurry right at the target height, and the slab usually needs 24 to 48 hours before you can drive on it. On a small pad, jack-and-pack is simpler; on anything bigger, it's a job to hand off.
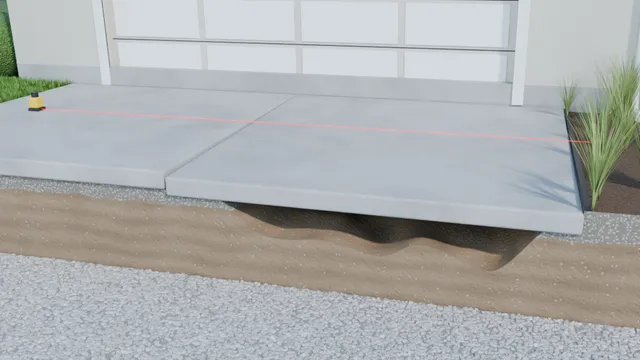
3D render, not a job video. It's a generic example, a driveway slab that sank at the garage door; the steps are the same on any slab. The ground is cut away so you can see under the slab; nothing is dug on a real job. Simplified to four ports; a real 10 by 10 foot section usually gets six to ten. The foam's weight, strength and set time, with sources, are in how foam lifting works.
Transcript: what the video shows (23 seconds, no sound)
- 1. Set the line. A laser line off the slab that didn't move shows how far the low one has to come up. This one sank about 2″, a little more at the corner.On screen: About 2″ low; Laser line = target; Empty space under the slab.
- 2. Drill and set the ports. 5/8″ holes, kept in from the edges, then a plastic injection port tapped into each one so the gun can lock on.On screen: Injection ports.
- 3. Pump the foam. Two liquids travel down separate hoses and mix in the gun. They go in through the first port and run to the lowest spots.On screen: Liquid runs to the low spots.
- 4. Expand and fill. Within seconds the mix expands 15 to 22 times its liquid volume and fills most of the space from that port. The next port fills the rest, pressing loose soil tight.On screen: Expands from the first port; Second port fills the rest.
- 5. Lift to the line. Once the space is full, short shots, port to port, raise the slab evenly. We stop when it meets the line.On screen: Short shots, port to port; Back on the line.
- 6. Patch and caulk. The ports come out, each hole is packed with grout and troweled flush, and the joint at the garage gets a bead of flexible sealant.On screen: Garage joint caulked.
Where DIY Lifting Goes Wrong
These are the common mistakes, and they're the same whether you're using a jack or a foam kit:
- Over-lifting. Foam keeps expanding for a bit after you stop injecting. Push one more shot because it "looks almost there" and the slab ends up high. Foam can't lower concrete, so the usual fix is cutting the slab out.
- Cracking the slab. Lift one corner too far, too fast, and a slab that's tight against its neighbor, the foundation, or a step will snap. Small increments, rotating between holes, is the whole game.
- Not knowing where the void is. The empty space often isn't where the slab looks lowest. Tap it with a hammer or drag a chain across it: solid concrete rings, hollow spots sound dull.
- Too few holes. One or two holes can leave the slab sitting on a lump of foam with hollow space around it. It looks level until you stand on the edge.
- Foam escaping. Foam takes the easiest path: out through cracks and joints, under the neighboring slab, into the lawn, or along a gap toward the foundation, a window well, or drain tile. Next to the house, that last one is the expensive surprise.
- Concrete dust. Drilling concrete makes fine silica dust, and OSHA warns breathing it over time can permanently damage your lungs. Use a vacuum attachment or water, and wear a respirator.
Why Self-Leveling Compound Isn't a Lift
Self-leveling compound and resurfacer are overlays. They're a thin layer of cement-based material that flows over the top of the slab. They're great at smoothing a rough surface or filling shallow low spots on a slab that hasn't moved. They don't raise anything.
The numbers make it clear. A common bagged resurfacer goes on from a feather edge up to about 1/2". A common self-leveling floor product maxes out around 5/8" per layer and is labeled indoor-only. A walk that dropped an inch and a half needs a lift, not a pour.
Build it up in layers anyway and the void underneath is still there. When the slab moves again over a Wisconsin winter, the thin layer on top cracks with it.
Good use: a garage or basement floor with a rough surface or a shallow birdbath, on a slab that's stable. Bad use: a sidewalk square that sank, or a slab that rocks.
DIY or Call Someone?
| Job | DIY? | Notes |
|---|---|---|
| Relay pavers or stepping stones | Yes | Firm, compacted base is the whole job |
| Re-level a plastic AC pad | Yes, carefully | Watch the refrigerant lines, or let your HVAC tech do it |
| Patch chips and small holes | Yes | Follow the bag's temperature and traffic times |
| Seal joints and cracks | Yes | Clean first; backer rod in deep gaps |
| Fix downspouts, sump discharge, grading | Yes | Contact Diggers Hotline before trenching |
| Smooth a rough interior floor with self-leveler | Yes | Stable slabs only |
| Jack-and-pack a small stepping pad | Maybe | Heavy, slow, and crack-prone |
| Foam kit on one small square or step | Maybe | Practice patience; you can't undo an over-lift |
| Lift a full sidewalk panel or several in a row | Call someone | Weight, multiple holes, and lift sequencing |
| Driveway, garage approach, or garage floor | Call someone | Big, heavy slabs that have to drain right |
| Stoops, patios, walks against the foundation | Call someone | Foam escaping toward the house is a real risk |
| Slabs pushed up by roots or frost | Call someone | Lifting can't lower them. Frost: the neighbors get lifted to meet it. Roots: may need replacement |
A Quick Self-Check Before You Buy Anything
- 1Did it sink, or is the surface just rough?Sinking means lifting. Rough means patch or resurface.
- 2How big is it?Bigger than a stepping pad or one small square is a hard DIY lift.
- 3Is it touching the house?Think twice before injecting anything there.
- 4Is it solid?A slab in pieces won't lift as one unit no matter who does it.
- 5Where's the water coming from?Fix that first. It helps whatever you do next.
If You'd Rather Hand It Off: Lifting in Green Bay
What it costs. Our lifting jobs start at a $300 minimum, and on average land between $4 and $10 per square foot, set by how far the slab has sunk, the void under it and its size. On average that's about half of what tear-out and replacement runs around Green Bay. A single sidewalk panel or AC pad is usually $300–$600, a garage apron $400–$1,000, a patio $600–$1,500. The full sheet, with what moves a job up or down, is on our concrete leveling cost page.
When it happens. Lifting runs from the spring thaw, usually late April, until the ground freezes in November. Photo quotes are answered all winter, so a slab you notice in January can have a firm price and a spot at the front of the spring schedule before the frost is out.
What you're buying. Every lift carries a 5-year re-lift warranty, the holes are 5/8 inch and patched flush, and you deal with the owner from the first photo to the finished slab. Our concrete leveling service covers every surface we lift, and the town pages for Green Bay, De Pere, Howard, Suamico, Ashwaubenon, Bellevue and Allouez cover what's different about the ground in each.